(Content modifed: November, 2025)
(File modified: November 24, 2025 3:35 pm)
This site works better with Javascript enabled.
Michael J. Hannah, Los Ranchos, NM.
 My experience with the LifeGlider® walking aid
for use with my sIBM condition
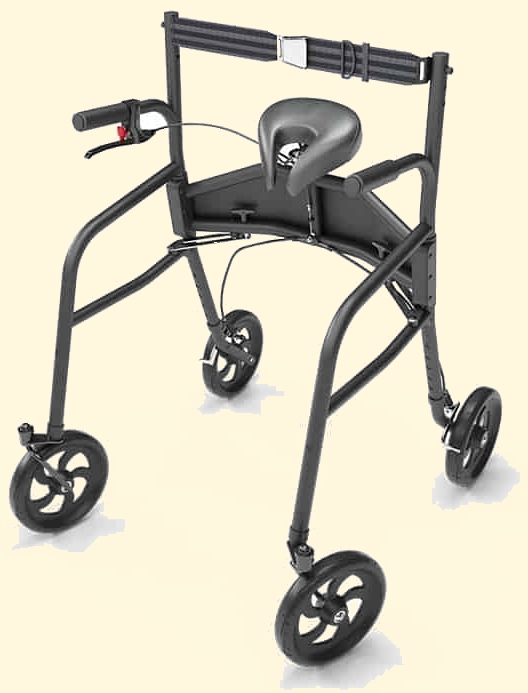
I purchased1 a LifeGlider® (Tall) as a walking aid in August 2025 due to my diagnosis with Sporadic Inclusion Body Myositis (sIBM). I primarily got it for use inside the house when I plan to be up and on my feet for some time but need the use of my hands, like in the kitchen cooking or doing other chores. As I note in other posts on this site I continue to use (and swear by) an Alinker rollator for my regular exercise walking, and also frequently use the Drive™ Nitro rollator for the variety of other uses I describe in its post. I also recently purchased a Pride Mobility® Jazzy® Ultra Light electric wheelchair in anticipation of gradually becoming unable to walk as much as I do now, and will review it when I have used it enough to do so.
Since my progressively declining sIBM stage still2 allows me to stand and walk carrying my own weight, a walking aid continues to be an appropriate option for me. Unfortunately on more than one occasion when using the Alinker or the Nitro the muscles of a leg unexpectedly gave out, as is common with sIBM. When a leg collapsed the Nitro did help me fall more slowly, but I did wind up on the ground with some resulting injuries. Yet the Nitro provides a seat whenever I need one. When a leg collapsed the Alinker’s seat was directly under me so I just rudely and abruptly sat firmly down on it. It not only prevented me from falling, but also avoided injuries when hitting the ground. I would use the Alinker indoors, but I find it a too big and cumbersome for my uses in our house. And like most rollators it requires use of the hands. Thus I am hoping being strapped in to the LifeGlider with its belt and having its seat under me is likely to be much safer than the Nitro should a leg give out when walking, while still allowing being hands free. However when I no longer wish to be standing it provides no really usable seating. Finally its wheels are really only meant for smooth surfaces, and does not work on general terrain outdoors.
While the LifeGlider and both the Nitro and Alinker rollators have their different advantages and disadvantages, all have characteristics my physical therapist recommended in any aid for walking, especially with my sIBM condition. First, she recommended a rollator which will simply roll along as I walk with a continuous gait, rather than a walker which requires being lifted or pushed out in front and then walking up to it thus interrupting the gait. As sIBM further weakens my hand and arm strength, lifting and pushing a walker will become a strength issue which any rollator generally does not require.
Note that the LifeGlider comes in three sizes: Small, Standard, and Tall. As I am six foot I ordered the Tall. It is very important to purchase the correct size as you will be strapped into this device and it must fit your body to be able to be used. When you receive your appropriately sized LifeGlider you still will need to make adjustments to two features: the four legs and the belt.
Adjusting the height of the legs
You first need to insert and adjust the height of the legs. The main goal is to set the legs to cause an appropriate height for the seat, as the seat itself has very little adjustment. You need the seat high enough for your rear to be actually touching the seat, but low enough that when sitting on the seat your feet are on the ground so you can walk. This height generally wll also naturally allow your hands to easily reach and grasp the handles of the glider. My physical therapist recommends trying to have an upright posture when walking as important to maintaining my overall body strength and health, which the glider at this height will do.
Several YouTube videos show a fit twenty-something male just leaning over while holding the glider with one hand and then installing and adjusting the legs one at a time with the other. If you are like me (who has enough trouble just holding myself up), holding the glider up like this will never work!!! Instead, with the two sides of the glider frame locked open, lay one side on the ground. Now you can sit (e.g. in a chair, wheelchair, or rollator) and lean over to easily install and adjust the two legs which will now be stable in their frame at about seat level. There is nothing to hold up, and you can just slide each leg in and line up the stripes thru the holes to lock them to the length you need. Then just roll the glider over across its back to put the side you adjusted on the ground and adjust the two legs on the other side which is now stable at seat height.
If you are tall like me, you will need to modify where the belt attaches to the glider. The manufacturer recommends3 the belt should fit snugly across the hips, right above the hip bones but below the belly button. By default the belt comes attached to the middle of three holes on the back vertical posts. But even with the Tall version of the glider my torso is so long that the default position of the belt rests very low across the hip bones. I used a wrench to unscrew the bolts and moved the belt to the top of the three holes. (When you unscrew, WATCH CAREFULLY how the multiple washers are placed on both the inside and outside of the bolt so you can reproduce their positions when you reconnect.) I then also loosened the seat and slid it down some on its post to give even more space between the seat and the belt. (Be careful not to slide it down too far or the sides will not fit under it when they collapse.) While this still positions the belt across the hip bones below their tops, when I lean forward I find the bones rather than the belly supports me and it works very well.
I choose to cinch the belt tight enough that it ensures I remain on the seat with some of my weight taken off my legs. When I tighten it, I sit on the seat and lean back some and then can pull it tighter. Find the right tightness for you, because it can be either too tight (you cannot move freely) or too loose (it doesn't hold you against the seat).
Collapsing the sides for storage
The YouTube videos show a person standing with the back of the glider against their legs. They lean over and pull up on the release latch with the inside hand while pulling that side in with the outside hand. Not for me!!! My one hand is simply too weak to pull up against the strong spring on the release latch. Instead I first stand at the front of the glider with my legs straddling the left side as seen from the front. Now I put the thumbs of both hands on the top of the back with the two forefingers hooked under the two wings of the release latch handle for the side I am straddling. With two hands squeezing I am able to pull up enough to release the latch while simultaneously pushing in with my outside leg to begin to collape that side. Being sure I keep that left side from swinging open and relatching, I move my legs to the right side and unlatch it the same way.
Note: there is no mechanism on the glider to hold the collapsed sides closed!!! I attached a long hook-and-loop strap to the back post of the (left) side which collapses first which is long enough to reach around the front leg of the collapsed right side (now over on the left) and back again to hold the two glider sides closed. Otherwise the sides will flop open and RELATCH with any moving of the collapsed glider.
The LifeGlider works well when standing or simply walking forward. Other movements take adapting to its restrictions.
Moving sideways or turning sharply
Like most people I have 80 years of habit of moving and walking a particular way. When strapped in, the glider will simply not permit several of these automatic natural movements. For example, because the back wheels don't swivel you cannot simply side-step sideways without lifting the glider, such as moving from side to side at a counter. But if you slightly lift the whole glider you can then still do that natural sidestep. The important trick is to grasp the handles back of the padded grips at the curve of the handlebars, which is the balance point where you can pull the entire glide including the back wheels off the ground. This slight lift trick also works to let you spin in place directly around back to front without having to walk a circle. These actions are not hands-free, but at the counter I simply first position any items I will need along the counter, then lift the glider to move myself sideways. That is still faster, easier, and less awkward than the glider’s forced movement of walking a curve out then a curve back. Finally, when not lifting the glider you cannot just turn your body when you want to curve. Instead you need to step slightly forward but mainly sidestep and the glider will perform a rolling curve pivoting on the back wheels.
I find that when I want to be hands-free (i.e. when I have things in my hands) any movements other than straight forward require smaller (baby) side steps in the direction I want to turn to curve the glider. Also if I need to make a sharp left or right turn, such as into a door along the hallway, I first get almost to the door but at the opposite side of the hallway. Then I have enough room to make a side-stepping curved turn to the door. Now I can walk straight into the door, then turn as needed when through. Of course if your hands are available you can just grip the handles and slightly lift the front wheels to do any turning from a straight forward walk as needed.
If all four wheels could swivel (maybe as an option?) I believe this would now allow nearly natural movement when in the glider. I have seen devices with four swivel wheels for infants as trainers when learning to walk. However, I can understand that the current design greatly minimizes the possibility of falling backwards, and also allows for a simple braking system which is useful when getting in it. However I have never used the brakes while moving, and seldom when standing. I actually thought about trying to order a set of front legs from the manufacturer to insert to replace the back legs. I could cope with eliminating the brake by always bracing the glider's back when strapping in, but I believe the angle of these front leg parts would make them tilted when in the back frame so fear they would not swivel. (Sigh!)
I plan to continue to experiment and learn more about how to use this device. I currently find partially sitting is helpful to take weight off my weak legs when I need to be standing for a considerable time. I also find it useful enough that I think it worth my time to more fully discover what I must do to use it successfully. But it does make it difficult to bend over to get something out of a low cupboard. Further the front wheels stick out enough that I cannot get as close to a counter as I would wish.
Hopefully these first impression comments will be of some value to others who are either considering or using this device.
Endnotes
1. The LifeGlider may be available from multiple sources but I bought it from the manufacturer.
2. Ultimately my muscles are expected to become so weak that I will not be able to use a rollator and will require some kind of electric wheelchair like the Ultra Light for mobility.
3. See the video titled Fastening the Belt: https://mylifeglider.com/instructional-videos

Disclaimer
This document simply expresses my personal opinion. I am not affiliated with LifeGlider® in any way and do not claim this is the “best” walking aid for use by someone with the medical condition of sIBM. I simply report that I choose to use it and find it useful. Any use of this device is obviously at the user’s own risk.
As described in a separate document, this document was composed with Adobe® FrameMaker 2019®, converted using its hyperlink and "Save as HTML" features, post-processed with my custom Perl© script, linked to my Responsive CSS file which references my fixed set of fonts, and the HTML and CSS are W3C validated.
©MJH Consulting, 2020-2023. All rights reserved.
 (Content modifed: November, 2025)